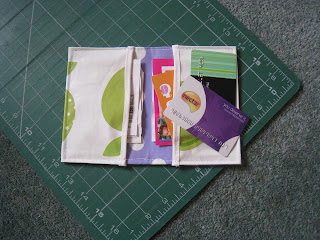
This week's tutorial is born out of necessity. I don't know about you but to be honest, my purse is just not big enough, if it isn't receipts, then it is loyalty cards (I am into double figures with these... I am a coffee tart in London!) and school vouchers that I am expected to stuff in there. As a Chair of Governors for an inner city primary school, I grab every school voucher I can get... for my American readers this is just like being on a school board although we are all volunteers and unpaid, and I have been a governor for over 20 years but that is another story and you know I will tell you eventually!
So I thought if I had a loyalty card wallet, I would be made up, also it will be somewhere that I can store any expense receipts and I don't know about you but why are purses always in dark colours so you cannot find them when you need them?
Let's get started, we are going to make this one from oil cloth (remember how we conquered it here recently) but you could use a heavy duty cotton fabric with a sturdy iron on Vilene interfacing.
You will need:
2 pieces of oil cloth or cotton fabric 15" wide x 6" deep
14" bias binding tape
Cotton and scissors
Clothes pegs
Pins
Cup of tea or coffee
Place the oil cloth with right (shiny) sides facing and peg them together.
Now check the tension on your sewing machine on a scrap of fabric... it took me six goes to get it right, remember you are going to be doing slow and steady sewing, this is not a race, it is a stroll.
Sew up both long sides leaving the ends open.
Now go and make a hot drink, tea or coffee and sit with the sewing in your lap, this will warm up the oil cloth and the warmer the cloth is, the easier it will be to work with.
Now turn the tube inside out and it will look like a sleeve, gently roll the seam, remember you won't be able to iron it as it will melt the fabric. Using your hands flatten the sleeve so that the seams sit at the top and the bottom.
Take your bias binding and leave about an inch above the open end and pin it, then fold the bias binding over the open seam, clip it into place with the clothes pegs. Then sew the bias binding in place leaving the same amount of excess at the other end. Repeat this at the other end.
Decide which side of your oil cloth is going to be on the outside, then fold over each side 3" in on each side, folding the excess bias binding under and hold it in place with your pegs.
Top stitch around the wallet, I use the edge of my foot to guide me, when you come to the corners, leave your needle in the fabric and turn it 90 degrees so that you get a nice neat professional finish.
Finally trim any excess bias binding away and then put in your vouchers and loyalty cards.
Now let's take a look at what the team have made for Handmade Monday.


14 comments:
Clever! I like that a lot.
Great tutorial Ros - is that oil cloth material like the material you buy for your table with the wipe-able surface? Mich x
I love it. I've been meaning to make something for my post office runs - receipts and proofs of posting. Love the idea of loyalty cards!
Mich, it is the exact same stuff... make sure you take a look at local markets, not just your local fabric shops as you can find some great designs there.
thanks Ros x (boring place I live - no market!)
What a simple but useful idea. I wanted a new oil cloth table cloth so perhaps I could cut it up to make one of these and then buy a new one!! Sorted!
Lovely material and the loyalty-card wallet is a great idea. I hadn't realised that oil-cloth was available is such gorgeous colours/patterns. Hope you have a good week.
Really nice. Love it!
Very useful tutorial, my purse is full of loyalty cards too (and not enough money to put points on them!)
LH
x
Thanks for taking the time to post this useful tutorial. My purse is stuffed to the gunnels as well!
I received a Versatile Bloggers Award this week and am pleased to nominate you to receive this Award too.
Have a look at this post for more details:
http://youloveityoudo.blogspot.co.uk/2012/04/hey-everyone-so-yesterday-jill-at.html
Hope you have a good week!
This is a great tutorial Ros - I am going to have ago with fabric first though!
Jo x
This is a great tutorial Ros - I am going to have ago with fabric first though!
Jo x
Lovely material and the loyalty-card wallet is a great idea.
Clear business cards
Post a Comment