Yes, you read it right, this is the knicker bag tutorial and is I think the very first bag I ever made way back in the early 70s when the craze for them hit the Convent. It was such a great bag for carrying books and files to school, although I never quite managed to get the Peak Freens biscuit tin in there for Domestic Science!
As you can imagine the design is based on an outsize pair of knickers, with the gusset becoming the handle and the waist being sewn across to create the base of the bag... now before you think I have lost the plot I can tell you that no lingerie will be harmed in the making of this bag, so let's get started.

You will need:
A heavy cotton for the outside (32" wide by 28" long)
A lighter lining fabric ((32" wide by 28" long)
Cotton
Pins, needle, tape measure, cotton and scissors or rotary cutter, ruler and mat
Water soluble Pen
(Greaseproof paper)
Side plate
Iron and ironing board
Sewing machine

Iron your fabric, then fold it in half verically (you need to fold your pattern vertically as if you do this horizontally you will end up with one side of your fabric headed in the wrong direction!). Measure up 14" and draw a line across with your pen creating an oblong 16" wide by 14" long. Make mark 2" in on both sides on your square, then move to the top of the fabric and mark it at 5 1/2" and mark again at 5" from that spot. Draw a line 7" down from the top, the place your side plate against the end of your 7" line and against the spot 2" in and draw around the plate to create a quarter circle curve.

If you do not feel confident doing this directly onto your fabric, then use greaseproof paper to draw your template on. Now cut out along these lines - DO NOT DISCARD THE CENTRE SECTION - we are going to use that to create your pocket in the bag. On the bag, cut along the folded edge.

Using your top fabric as the template, place it on your lining fabric and cut around it.
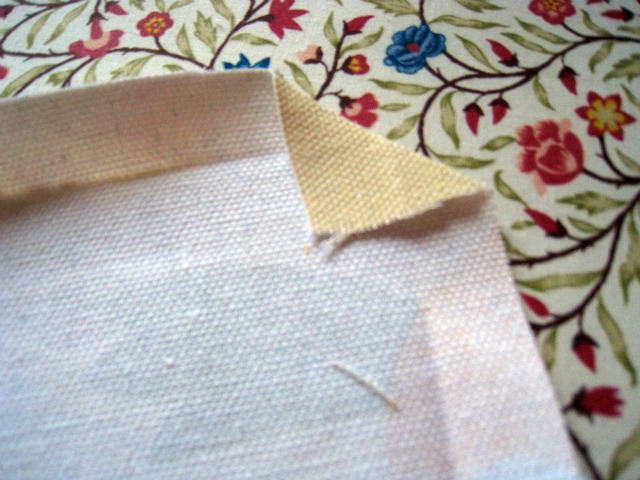
Now sew down the side, across the bottom, and up the other side using a 5/8" seam allowance. Press the sides seam open so that they lie flat. You need to create a right angle (the corner of a square and get the seam to bisect it at 45', which will be slap bang in the middle).

Measure an inch from the corner on each side and sew across which creates a triangle and cut just above your seam allowance.

This will create the base of your bag so that it will sit nicely when you put it on the floor. Finally sew the handle together at the top and turn the bag the right sides out.
Using the centre section, measure 7" down from the top and cut straight across, you should have a piece of fabric measuring 10" x 7".

Press a seam all round of 5/8"... now we are going to mitre the corners, this is really easy to do if you follow the pics below.
First fold a triangle across the lowest point of your square.

Now, fold one seam across to bisect the triangle and repeat it with the other seam and look at the lovely sharp point corner you get, pin them both down.

Now run a seam across the top of the pocket.

Pin the pocket in 3" on both sides and 4" up from the bottom of the fabric. Sew around the pocket. Then divide the pocket up (I use my mobile phone so that I have a place for it) and sew another seam up the pocket. Now sew up the lining just as you did with the outer fabric.

Leaving your lining inside out but turn your outer fabric so that it is the right way. I now want you to turn the raw edges under 5/8"... you will notice that on the curves this is really difficult, which means we will need to ease the fabric by cutting triangular notches, just short of the fold, makes the fabric much easier to manipulate, doesn't it?

Now match up the seams at the top and at the side and pin the lining to the outside of your bag, using your machine top stitch it 1/4" from the edge, I find it best to use the edge of my foot as a guide.

Finally if you feel that the lining is a little bit loose, catch it with a little stitch on the corners at the base.

Now off to Wendy's Homemade Monday for the first in Year Two's offerings!
And finally this week's tute is dedicated to Marion's ageing crafting hippies in their home down in Wales, let's hope they shake their Zimmers to the infamous Big Panty Woman posted below:
Bet it made you smile :)
31 comments:
I'm always looking for new bag shapes, so I shall give this a go sometime soon.
Very clever. I enjoyed the story behind the knickers bag!!
Another brilliant idea, Ros. I Pinned you, I hope you don't mind!
Oh yes, I remember these very well. Great fabric. Off to watch the Zimmer Gang. Hope you have a great week.
Love, love, love, that fabric, and the idea of knickers with enormous gussets! Great tutorial, will definitely have a go at this,
Penny x
I have just discovered your blog and I think it's absolutely fantastic, I too enjoy crafts. I'm new to blogging so have a lot to learn.
What a super bag. I reckon there's plenty of room in there for a packet of custard creams - my current favourite sin! Well, it's holiday time - why not? Thanks for the tutorial.
Great tutorial Ros - Mich x
I love your tutorials Ros x
Oh I remember these and very useful too. Love the birds fabric
Brilliant tutorial, as usual! How is it I never remember these being called Knicker bags?? Love the big panty woman song! :-D
Brilliant tutorial - love the title :)
you always make it look so easy - what a great shape!
What a super bag!
That fabric is so sweet! It looks lovely :)
Another great tutorial - and a great name! Love the birdie fabric.
Jo x
I love it! I can see me having to get the sewing machine out! xx
The fabric is super cute! I am definitely going to try one of these!
I've got a couple of these bags, I've never called them knicker bags but it's a great name for them. It's a great tutorial Ros.
I love the Big Knicker song, Sarah Kennedy often used to play it when she done Radio 2 and yes it did make me smile :)
Jan x
Lovely bag! Never knew they were called knicker bags - adds a whole new dimension to them though!!
Alison x
Blue Forest Jewellery
What a great tutorial Ros
Great tutorial! Yet another thing to add to the "Stuff I Want To Make" list...
Great tutorial. Knickers are undies, yes? BTW that fabric is so so cute!
This is brilliant!What a fab idea!Thanks for visiting my blog and leaving your lovely comment-in answer to your question,an ATc is an Artist's Trading Card.They're 2.5in by 3.5in and are made to be swapped-always traded never sold!
I love making bags but I find they can be quite time consuming. This looks fun, practical and relatively quick to make! Much fun!!
What a great tutorial - and I had never heard of these being called knicker bags so that was a new one on me!
I've never seen a bag like this before (yep I'm an 80's baby!!) but I love that material it is so cute! Another brilliant tutorial Ros thank you X
Fab tutorial. Lovely fabric (oh, there I go again!)
Such a great idea and your introduction to the tutorial really made me smile!
I did raise an eyebrow when I saw the title but that bag looks great and the fabric is gorgeous. x
I've been collecting old jeans for craft projects, I think this shape would be great for old denim. Not too many seams!
Post a Comment